If we follow good security practices and deploy our database in a private subnet, direct database access is closed off from the wider internet. This is great for security, but can be frustrating when we just need to run some quick SQL commands from our local machines, connect a server that's not in the same network, or download some data without creating an API for this singular purpose. Luckily, we can get around this without exposing our database to the public internet with a "bastion host".
# Update (July 9)
An infrastructure-as-code deployable example (opens new window) using the AWS CDK is available now for a quickstart cloud architecture to test a bastion connection to a Postgres database in a VPC.
# What is a Bastion Host?
In medieval architecture, a bastion is a protrusion from a fortification that provides the most strategic vantage point possible without introducing any weak points to the structure. So if we relate this to our problem, a bastion host in computer science will function similarly - providing a point of access into a "fortified" private network without adding to the surface area of cyber attacks of your infrastructure. In practical terms, we will be using AWS infrastructure throughout this article, but the principles apply to any system of any scale we may work with. In our case, let's say we have a PostgreSQL - configured RDS instance living in a private subnet of our VPC. We're proud of our foresight and sleep soundly knowing we've done more than most to ensure the security of our application. A few sprints later, our project manager asks us to collect some data on the past few months of data for a big client meeting and, since this impromptu meeting was unforeseen, there is not much time to collect it. Since we've deployed our database in a private subnet, we can't connect to it to run our SQL queries and there isn't enough time to update our application code to retrieve this data either, so we will need to create our bastion host to proxy our connection.
# How to Create a Bastion Host
# Deploying the Server
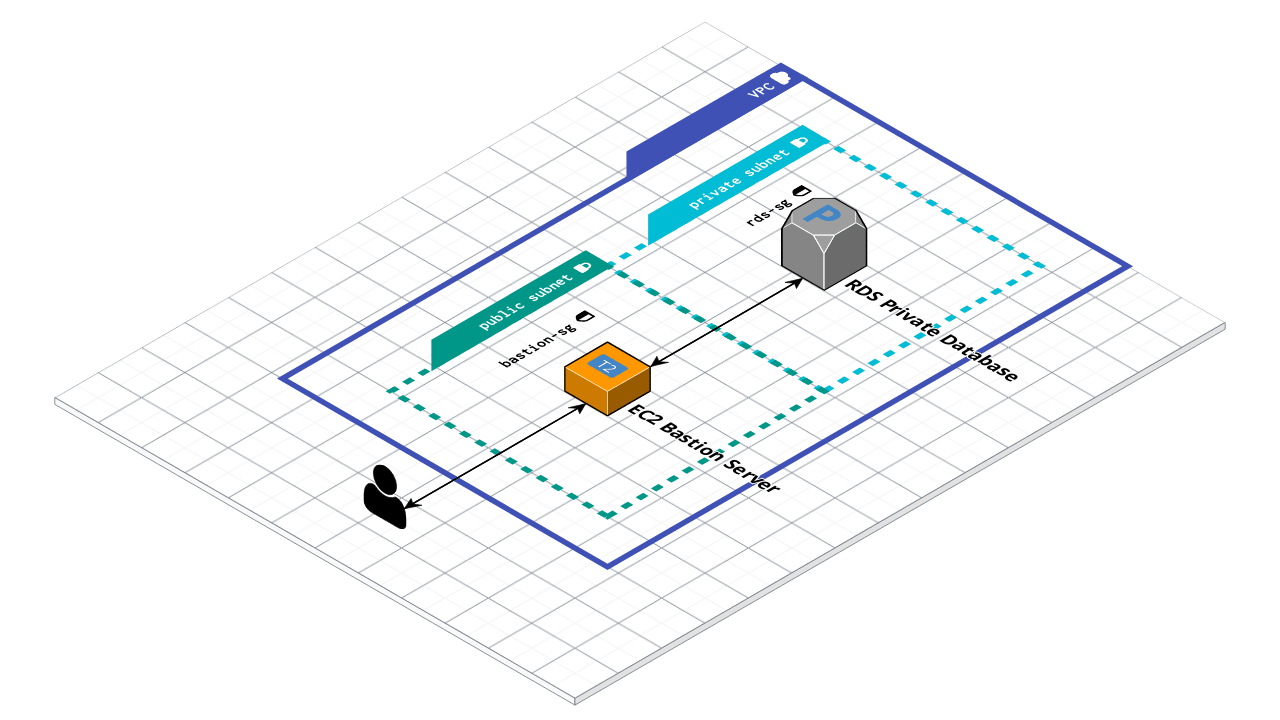
We can deploy a simple EC2 instance (T2 Micro running Amazon Linux or Ubuntu will work fine) using the dashboard (opens new window) or command line (opens new window) making sure to launch it in the same VPC as our database, but in a public subnet. This will be our bastion host:
aws ec2 run-instances --image-id ami-xxxxxxxx --count 1 --instance-type t2.micro --key-name MyKeyPair --security-group-ids sg-903004f8 --subnet-id subnet-6e7f829e
Note: replace the ids and credentials with your own information.
# Configuring the Firewall
After the server is launched (or while creating it in the dashboard), adjust the security groups for both the bastion host and the database to allow your machine to establish an ssh connection to your bastion host on port 22 and tunnel your psql connection to your database from your bastion.
The following section will describe how to configure our firewalls using the AWS CLI to ensure this information stays up to date with AWS's frequently changing landscape.
We will be allowing only connections from our IP in this example, so let's first get that information.
curl https://checkip.amazonaws.com
This will return our IP address (e.g. 203.0.113.57).
Next let's update our EC2 bastion host to accept incoming connections on port 22.
aws ec2 authorize-security-group-ingress --group-name ec2-bastion-sg --protocol tcp --port 22 --cidr 203.0.113.0/24
Last we'll update the database security group to allow connections on port 5432 (postgres) from our bastion host.
aws ec2 authorize-security-group-ingress --group-name rds-postgre-sg --protocol tcp --port 5432 ---source-group ec2-bastion-sg
*Note: we should replace group-name with the security group ids of our bastion host and database instance respectively, and cidr with our IP address.
# Connecting to a Bastion Host
After the instance is launched and the firewalls are configured and tested (we should be able to ssh into our bastion host), we can create our connection.
# Opening an SSH Tunnel
ssh -i "~/bastion_key.pem" -NL 8886:postgress.cpypigm0kth7.us-east-1.rds.amazonaws.com:5432 ec2-user@132.5.10.11 -v
8886 is the port on our local machine we will be using to open the connection; we can choose any available port we want here. The flag -N will set up the tunnel without creating a session with the bastion server, -L will forward the port, and -v will print the output logs to the console.
Once the output shows the connection is established successfully, we should check the port to make sure our machine is listening to the port correctly.
sudo lsof -iTCP -sTCP:LISTEN -n -P | grep -i --color 8886
Optionally, we can add a configuration to our ssh config file to keep the connection alive to avoid annoying session timeouts.
cat <<EOT >> ~/.ssh/config
Host *
    ServerAliveInterval 30
    ServerAliveCountMax 2
EOT
# Connecting to the Database
Now we should be able to connect to our database! If using postgres, the command will look something like this:
psql -h localhost -p 8886 -U <username> -W
That's it. Now we can use this connection to download our information in time for the important client meeting as well as reuse this solution for any future problems we may face.
# Conclusion
By creating an EC2 instance in our database VPC in a public subnet, configuring the firewalls, and establishing an ssh tunnel, we can interact with our database in a private subnet without introducing too much extra infrastructure or reducing the security of our application.
A fully deployable example (opens new window) is available on Github using the AWS CDK for a quickstart to test the infrastructure discussed in this article.
If you would like alternative solutions for specific vendors, databases, or local machines, please leave a comment and I'll add it to the repository!